How to 3D Print Resin Miniatures: The Complete Beginner's Guide (Start to Painted Mini)
Everything you need to go from zero to finished, painted miniature — printer setup, resin selection, slicing, printing, washing, curing, and painting prep.
Resin printing miniatures has a learning curve. It’s not a set-it-and-forget-it hobby — the first few weeks involve failed prints, exposure calibration, and at least one spilled resin incident. But once the process clicks, it’s one of the best things you can do for your tabletop hobby. Your miniatures are exactly what you want, printed in hours for pennies per model.
This guide covers the full workflow: selecting a printer and resin, setting up your workspace safely, slicing and orienting your first file, running the print, washing and curing, and getting the model ready to paint. Everything else on this site builds from this foundation.
Before anything else: resin safety is not optional and not going to be skipped here. See the resin printing safety guide for home hobbyists before you open your first bottle.
Part 1: What You Actually Need to Start
The Printer
MSLA resin printers use a UV LCD to cure liquid resin layer by layer. The three things that matter for miniature printing are:
XY resolution — The detail level in the horizontal plane. Measured in microns (µm). For 28–32mm miniatures, 35µm (4K) is good; 22µm (12K) is better; 18µm (16K) is excellent. The difference is visible but not dramatic at normal viewing distance.
Build plate size — How much you can print at once. A 132 × 80mm plate fits 4–6 medium miniatures. A 218 × 123mm plate fits 12–15. If you’re printing encounters or terrain, plate size matters a lot.
Z-axis resolution — Layer height capability. Most modern printers handle 0.025–0.05mm layers, which is what you need for quality minis.
For first-time buyers, the Anycubic Photon Mono 4K and Elegoo Mars 5 Ultra are the entry points. For more detailed recommendations with DnD-specific considerations, see best resin printer for DnD miniatures. For the most recommendations including budget options, the best budget resin printers guide has you covered.
The Resin
Not all resin is the same. For miniatures you’ll actually play with:
- ABS-like resin — Tougher, more flexible, better for models that will be handled. Siraya Tech Blu and Elegoo ABS-Like are the standard recommendations. Costs slightly more per liter.
- Standard resin — More brittle, fine for display pieces, slightly better detail on very fine features at larger print volumes.
- Water-washable resin — Uses water instead of IPA for cleanup. Convenient but more brittle than ABS-like; better for beginners who want simpler chemistry.
The full breakdown is in the best resin for miniatures guide. For now: if in doubt, get ABS-like resin in grey. Grey shows detail well and works for both display and play.
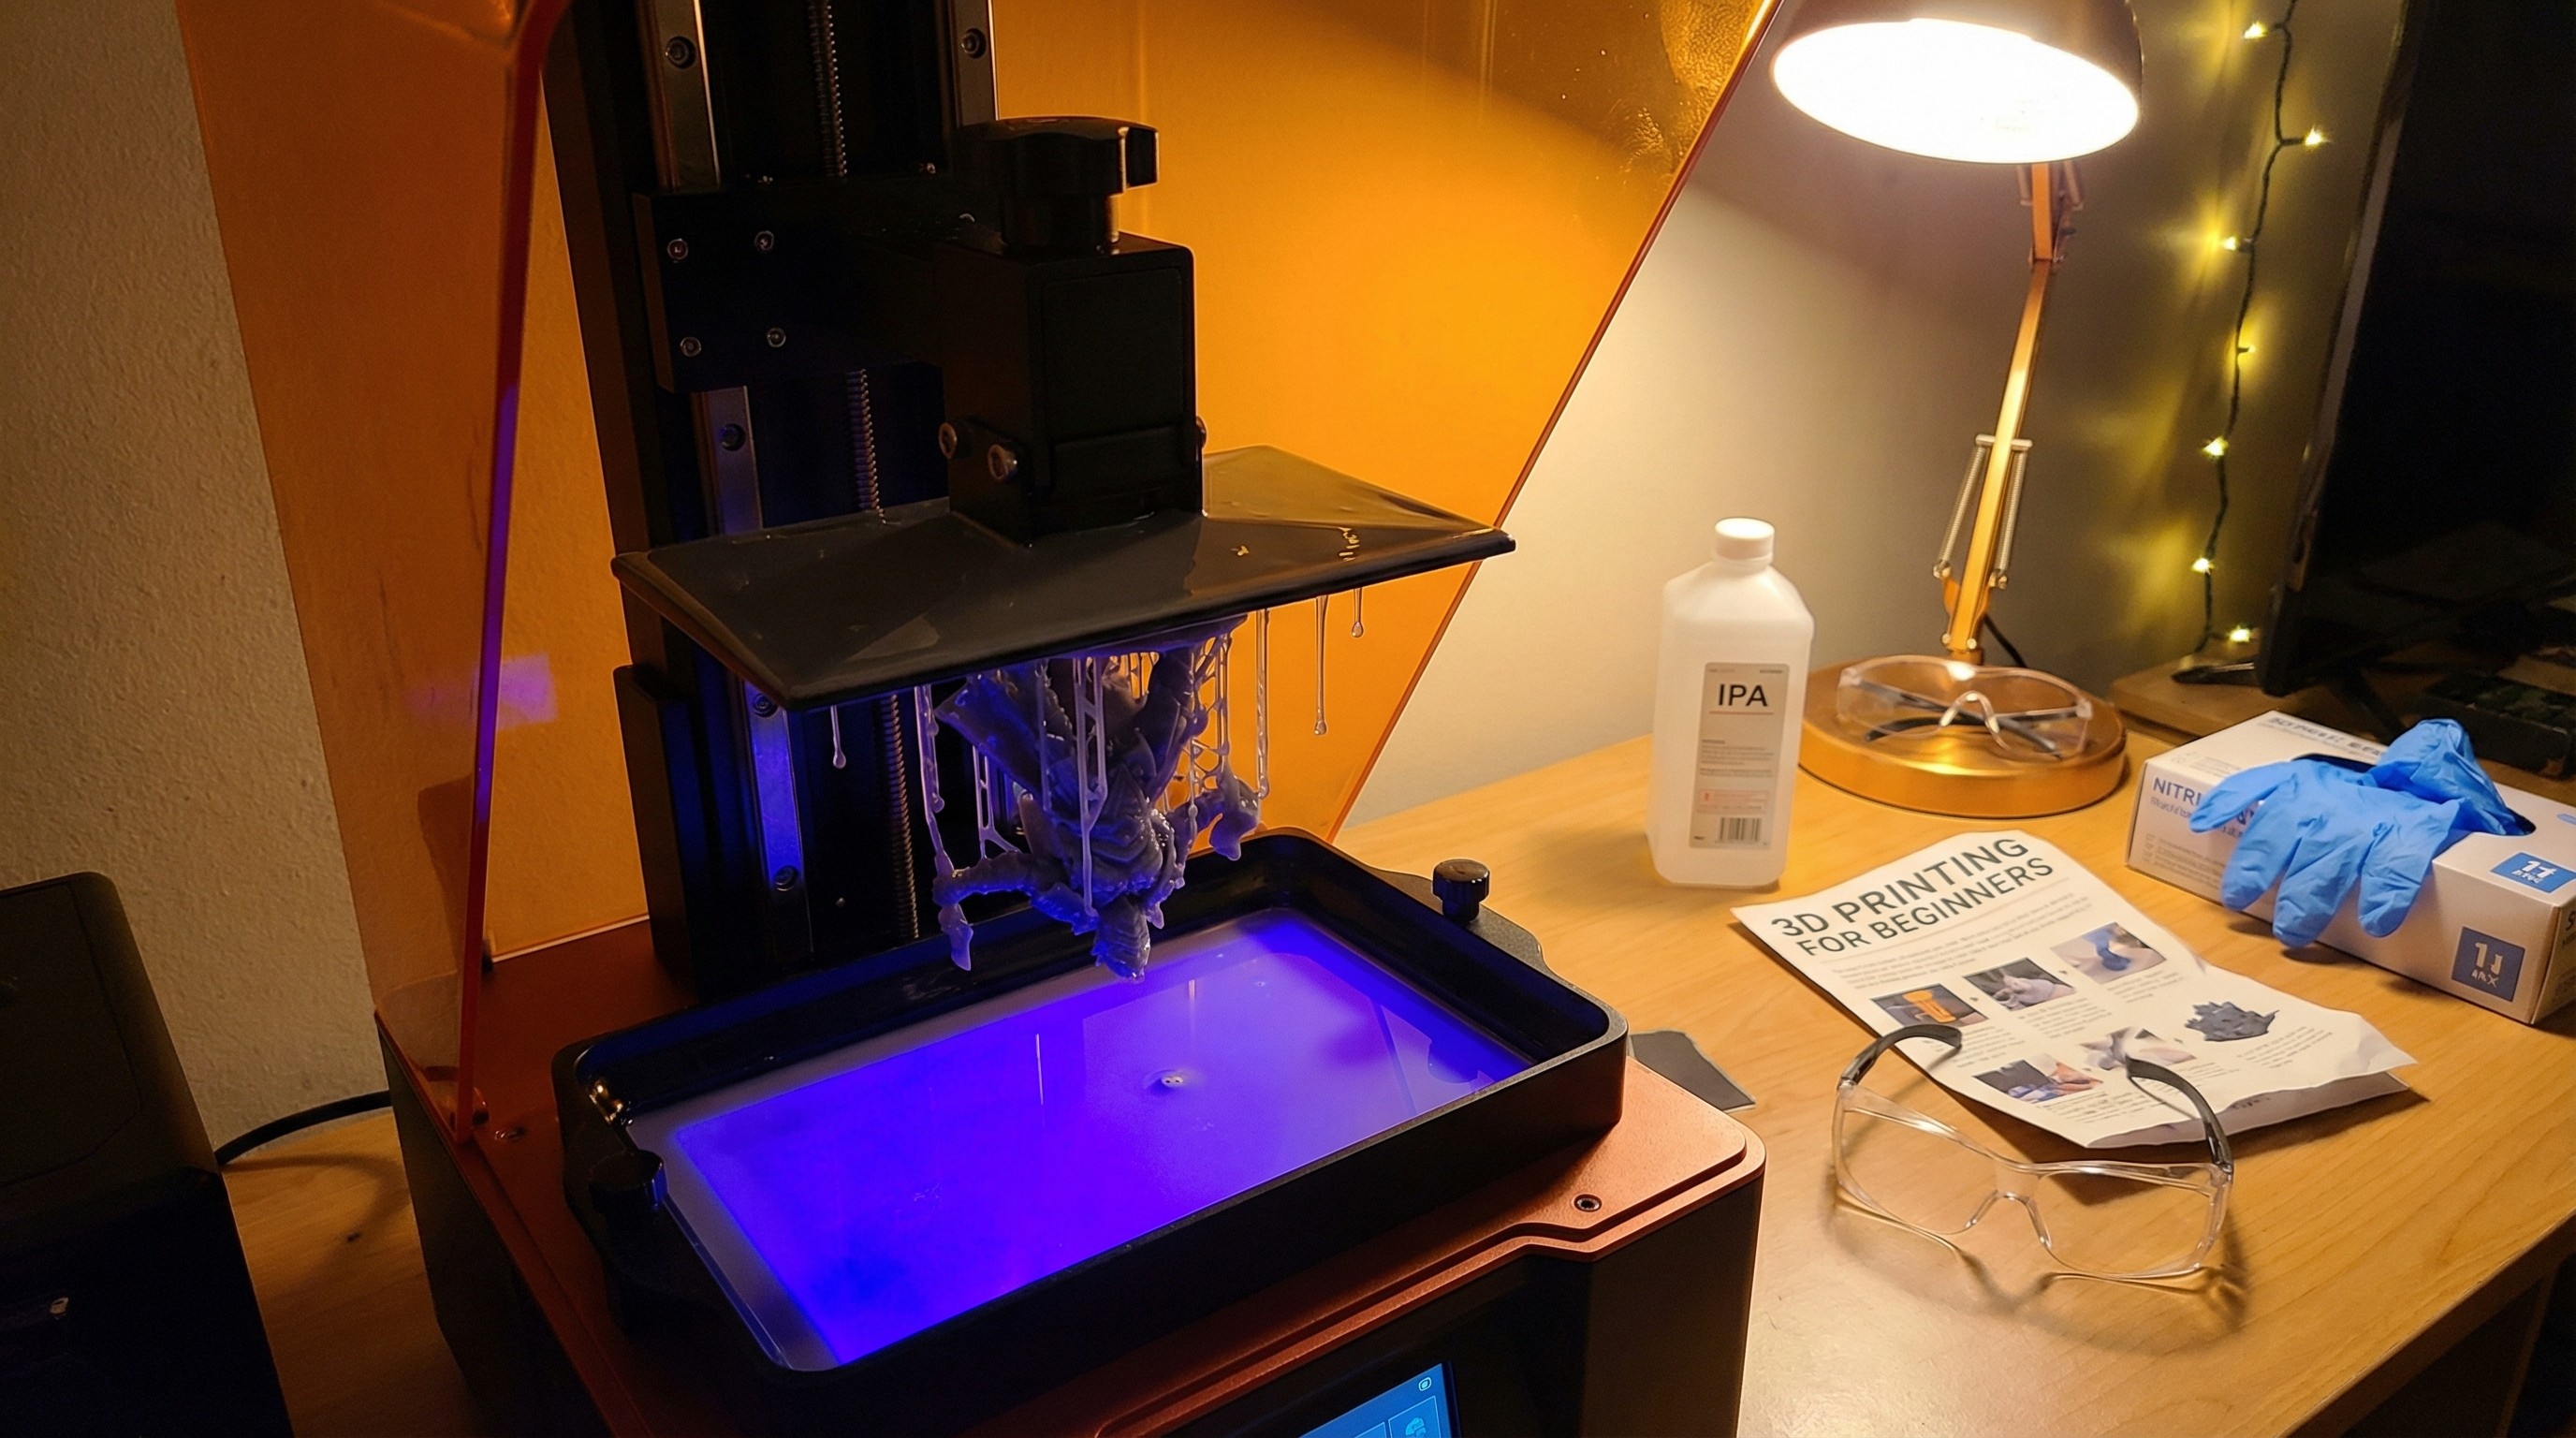
The Supplies You Actually Need
Before your first print, have these:
- Nitrile gloves — Not latex. Uncured resin is a skin sensitizer. Wear gloves whenever handling liquid resin or wet prints. This is the one rule that matters most.
- Safety glasses — UV curing light is hard on eyes. Any polycarbonate lens works.
- Isopropyl alcohol (91%+) — For washing prints. Get a container with a lid. Or use a dedicated wash station.
- UV curing station — Mandatory for consistent results. The Elegoo Mercury Plus and Anycubic Wash & Cure Plus are the standard picks.
- Plastic scraper or palette knife — For removing prints from the build plate.
- Paper towels — A lot of them.
- Resin funnels with mesh filters — For returning unused resin to the bottle.
Ventilation: resin fumes are no joke. Ideally print in a space with an open window and airflow. If that’s not possible, a proper respirator rated for organic vapors (not a dust mask) is the minimum. See the safety guide for the full ventilation setup breakdown.
Part 2: Workspace Setup
Set up before you pour the first drop of resin.
Cover your work surface — Resin stains permanently. A silicone mat or garbage bag under the printer saves your table.
Organize your post-processing area — Washing and curing happen right after printing, while gloves are on. Set up your wash station, cure station, and paper towel supply within arm’s reach. Fumbling around looking for things while holding a wet, uncured print is how accidents happen.
Plan for ventilation — Position the printer near a window or external airflow source. Running a fan toward an open window creates negative pressure that pulls fumes out. This matters especially during the print itself, which off-gasses throughout.
Know where your cleanup supplies are — Spills happen. Having paper towels and IPA immediately accessible makes cleanup faster and prevents resin from curing onto surfaces where you don’t want it.
Part 3: Your Slicer — Lychee or Chitubox
Your slicer converts the STL file into the layer-by-layer instructions your printer understands. The two options are:
Lychee Slicer — More powerful, better auto-support algorithm, slightly steeper learning curve. Free tier is functional; Pro subscription adds better auto-supports and a few advanced tools. Best choice for most beginners.
Chitubox — Simpler interface, widely used, good documentation. Basic is free; Pro adds multi-platform support and auto-support features. Easier to learn initially.
Both work well. The settings guide for Lychee at miniature layer heights is in the Lychee slicer settings for miniatures guide. Start with whichever your printer manufacturer recommends (Elegoo and Anycubic both have official profiles for both slicers).
The Key Settings to Understand
Layer height — 0.05mm (50µm) is the standard for most miniature work. Good balance of detail and print speed. 0.025mm gives better Z-resolution for very fine detail but doubles print time. Start at 0.05mm.
Bottom layers — Usually 6–10 layers. These adhere the print to the build plate with extra exposure time.
Bottom exposure time — 30–60 seconds depending on resin. Too short = print won’t adhere. Too long = hard to remove from plate.
Normal exposure time — The time each regular layer gets. This varies by resin brand, color, and printer light source. Manufacturer settings are a starting point; you’ll calibrate from there.
Anti-aliasing — Smooths staircase effects on curved surfaces. Turn it on. Usually a separate setting from the main exposure settings.
Part 4: Leveling the Build Plate
This is the highest-impact step for first-print success. A level plate means your first layers adhere correctly. An uneven plate means print failure.
Most resin printers use the paper method:
- Home the printer (Z-axis returns to zero)
- Loosen the build plate screws slightly so it can float
- Place a sheet of paper on the FEP screen
- Use the printer’s menu to lower the plate to zero position
- Tighten the build plate screws while the plate is pressed flat on the paper
- Set the Z=0 position in the printer’s menu
- Test by gently pulling the paper — there should be slight resistance
Your printer’s manual has the specific sequence for your model. Don’t skip this. Print failures from an unleveled plate look like the print peeling off partway through or sticking to the FEP instead of the plate.
Part 5: File Preparation — Getting Your STL Ready
You have your STL file (from wherever you sourced it — see the best STL sites guide for options). Now you need to get it into the slicer.
Step 1: Import and Orient
Import your STL into Lychee or Chitubox. Most files are designed to print at a specific orientation, but you need to verify:
- The model should be tilted 25–45 degrees from vertical on its longest axis. This prevents large flat suction surfaces from contacting the FEP simultaneously, which causes print failures.
- Detailed surfaces (faces, fine weapon shafts, elaborate armor) should face upward or away from the build plate, not toward it. Supports on detail-rich surfaces leave marks.
- Hollow areas (under cloaks, under outstretched arms) should face down so any trapped liquid has an exit path.
Auto-orient in Lychee or Chitubox is a reasonable starting point. Manual review is better for anything you care about.
Step 2: Supports
Supports hold the model to the plate and prevent unsupported overhangs from failing mid-print.
If your file is pre-supported: You’re done. Import as-is. Pre-supported files from professional designers are dialed in; don’t add more supports unless you see an obvious unsupported feature.
If your file is unsupported: Use auto-supports as a starting point, then manually review. Key areas to check:
- Fine weapon tips (swords, spears, arrows) — need supports even if they’re short
- Outstretched hands and fingers
- Hair and capes with extreme overhangs
- Bases of shield straps and buckles
Support tip size matters for miniatures. Use 0.3–0.4mm tips, not the default heavy supports the slicer might suggest. Heavy support tips leave craters in the model surface. Smaller tips leave smaller marks that are easier to clean up.
The full support placement guide is in how to add supports for resin miniatures.
Step 3: Hollowing (Optional)
Solid resin models use a significant amount of resin for their volume. Hollowing the model and adding drain holes reduces resin consumption by 40–70% for larger pieces.
For 28–32mm character models, hollowing isn’t usually worth it — the resin savings are small relative to the added complexity. For large monsters, terrain pieces, and anything over 50mm in any dimension, hollowing is worth learning.
See how to hollow resin miniatures in Lychee and Chitubox for the full workflow.
Step 4: Slice and Export
Check your exposure settings in the slicer match your resin manufacturer’s recommendations, then slice and export in your printer’s native format (typically .ctb for Chitubox/Elegoo, .pm3 or similar for Anycubic). Transfer to the printer via USB drive or WiFi, depending on your model.
Part 6: The Print
Check these before starting:
- Resin vat has enough resin (fill between min/max lines)
- FEP film is undamaged (no cloudiness, no visible holes)
- Build plate is level and properly tightened
- Lid is closed (UV from ambient light can cause surface issues)
Start the print and leave it alone. Don’t open the lid mid-print to check on it — this isn’t FDM printing where you can pause and watch. Let it run.
Print time depends on layer count and exposure settings. A 28mm character at 0.05mm layers typically takes 2–4 hours.
If the print fails within the first 30 minutes: Usually a leveling issue. Stop, remove any debris from the vat, re-level, and try again.
If the print fails mid-way: Check for model chunks on the FEP before your next print. Remove carefully with a plastic spatula. See why resin miniature prints fail for a full diagnostic guide.
Part 7: Post-Processing — Washing and Curing
This is where the model goes from fragile, sticky, uncured print to finished solid miniature.
Washing
- Gloves on before you touch the build plate.
- Remove the build plate and hold it over the vat for 30–60 seconds to let excess resin drip back.
- Remove the print from the plate using a plastic scraper or palette knife. Slide gently — don’t pry.
- Place the print into your wash station (IPA or dedicated wash solution). Run for 2–3 minutes.
- Remove and inspect. If resin residue is still visible in crevices, another 30–60 seconds.
- Let the print dry completely before curing. Residual IPA trapped in crevices during curing causes cloudy white marks. 10–15 minutes of air drying is enough.
Curing
- Place the dry print in your UV cure station.
- Run for the manufacturer’s recommended time — typically 2–4 minutes for most resins.
- Flip the model and cure the underside for the same duration.
Signs of under-curing: Tacky surface, soft to touch, slight flexibility in thin parts. Run longer. Signs of over-curing: Extreme brittleness, yellowing of clear sections, stress cracks. Don’t over-cure — it permanently weakens the model.
Support Removal
After curing, clip supports with flush cutters as close to the model surface as possible. A sharp pair of Xuron or Tamiya flush cutters leaves much smaller marks than dull or cheap ones.
Some hobbyists remove supports before curing (while the resin is still slightly flexible). This leaves cleaner marks but risks damaging the model if you’re too aggressive. Experiment with both approaches.
Minor support scars can be cleaned up with a small needle file or nail file. For visible scars on faces or other detail areas, see the guide on removing support marks from resin miniatures.
Part 8: Painting Prep
You have a clean, cured, support-removed miniature. It’s not ready to paint yet — resin surfaces need priming before paint adheres reliably.
Why Priming Matters for Resin
Resin is a smooth, somewhat UV-degraded plastic surface after curing. Paint applied directly to unprimed resin will chip and peel with minimal handling. Primer creates a micro-textured adhesion surface that paint bites into.
Use a dedicated miniature primer — Tamiya Fine Surface Primer, Vallejo Surface Primer, or Stynylrez are the standards. Citadel Chaos Black spray works. Cheap hardware store primer is a gamble (too thick, fills in fine detail).
Apply a thin, even coat and let it fully dry before painting.
First Paint Steps
Once primed, you’re painting a resin miniature the same way you’d paint any other miniature. The how to paint 3D printed resin miniatures guide covers the full painting workflow — basecoats, washes, highlights, and finishing. Head there for the continuation of this workflow.
Common Beginner Mistakes (and How to Avoid Them)
Skipping the calibration print. Manufacturer settings are starting points, not final answers. Run a small calibration print (AmeraLabs town or UVtools calibration matrix) before committing to a complex model. The 2 hours it takes will save you from 10 failed prints.
Not leveling before every print session. Until you’re confident your build plate is stable, re-level every time. Plates can shift.
Touching uncured resin without gloves. Resin sensitization builds up over time. One exposure might not cause a reaction. The tenth might. Always glove up.
Over-washing. More washing time does not mean cleaner prints. Over-washing (10+ minutes in IPA) can cause resin to become cloudy and slightly weaken surface detail. 2–4 minutes is enough.
Using the wrong resin for the application. Display pieces can use standard resin for maximum detail. Play pieces need ABS-like for durability. Using standard resin on models that get handled regularly means constant repairs.
Not filtering resin before returning it to the bottle. Cured resin particles from failed prints or support debris in the vat will contaminate fresh resin and cause FEP scratching over time. Always filter through a mesh funnel.
Frequently Asked Questions
How long does a typical miniature take to print? A 28mm character model at 0.05mm layer height takes 2–5 hours depending on your printer’s exposure speed. 0.025mm layers roughly double the time. Larger models (54mm+) scale accordingly.
How much does resin cost per miniature? A standard 25–32mm character uses 5–15ml of resin, depending on whether it’s hollowed and how dense the supports are. At $20–$30/liter for mid-range resin, that works out to $0.10–$0.45 per model. Large monsters and terrain pieces use significantly more.
Can I print in any color resin? Yes. Color resin works the same as grey — same process, same settings (or very close). Grey is recommended for learning because detail is easiest to see. Painting usually covers the base resin color anyway.
How often does FEP film need replacement? FEP life varies by usage intensity. Expect to replace it every 3–6 months of regular printing, or immediately if you see cloudiness (reduced light transmission), visible scratches, or holes. See the FEP replacement guide when you get there.
What’s the best slicer for beginners? Start with whatever your printer manufacturer recommends and has profiles for. Both Lychee and Chitubox work. The detailed miniature-specific settings for Lychee are in the Lychee slicer settings guide.