This article contains affiliate links — if you buy through them, we may earn a commission at no extra cost to you.
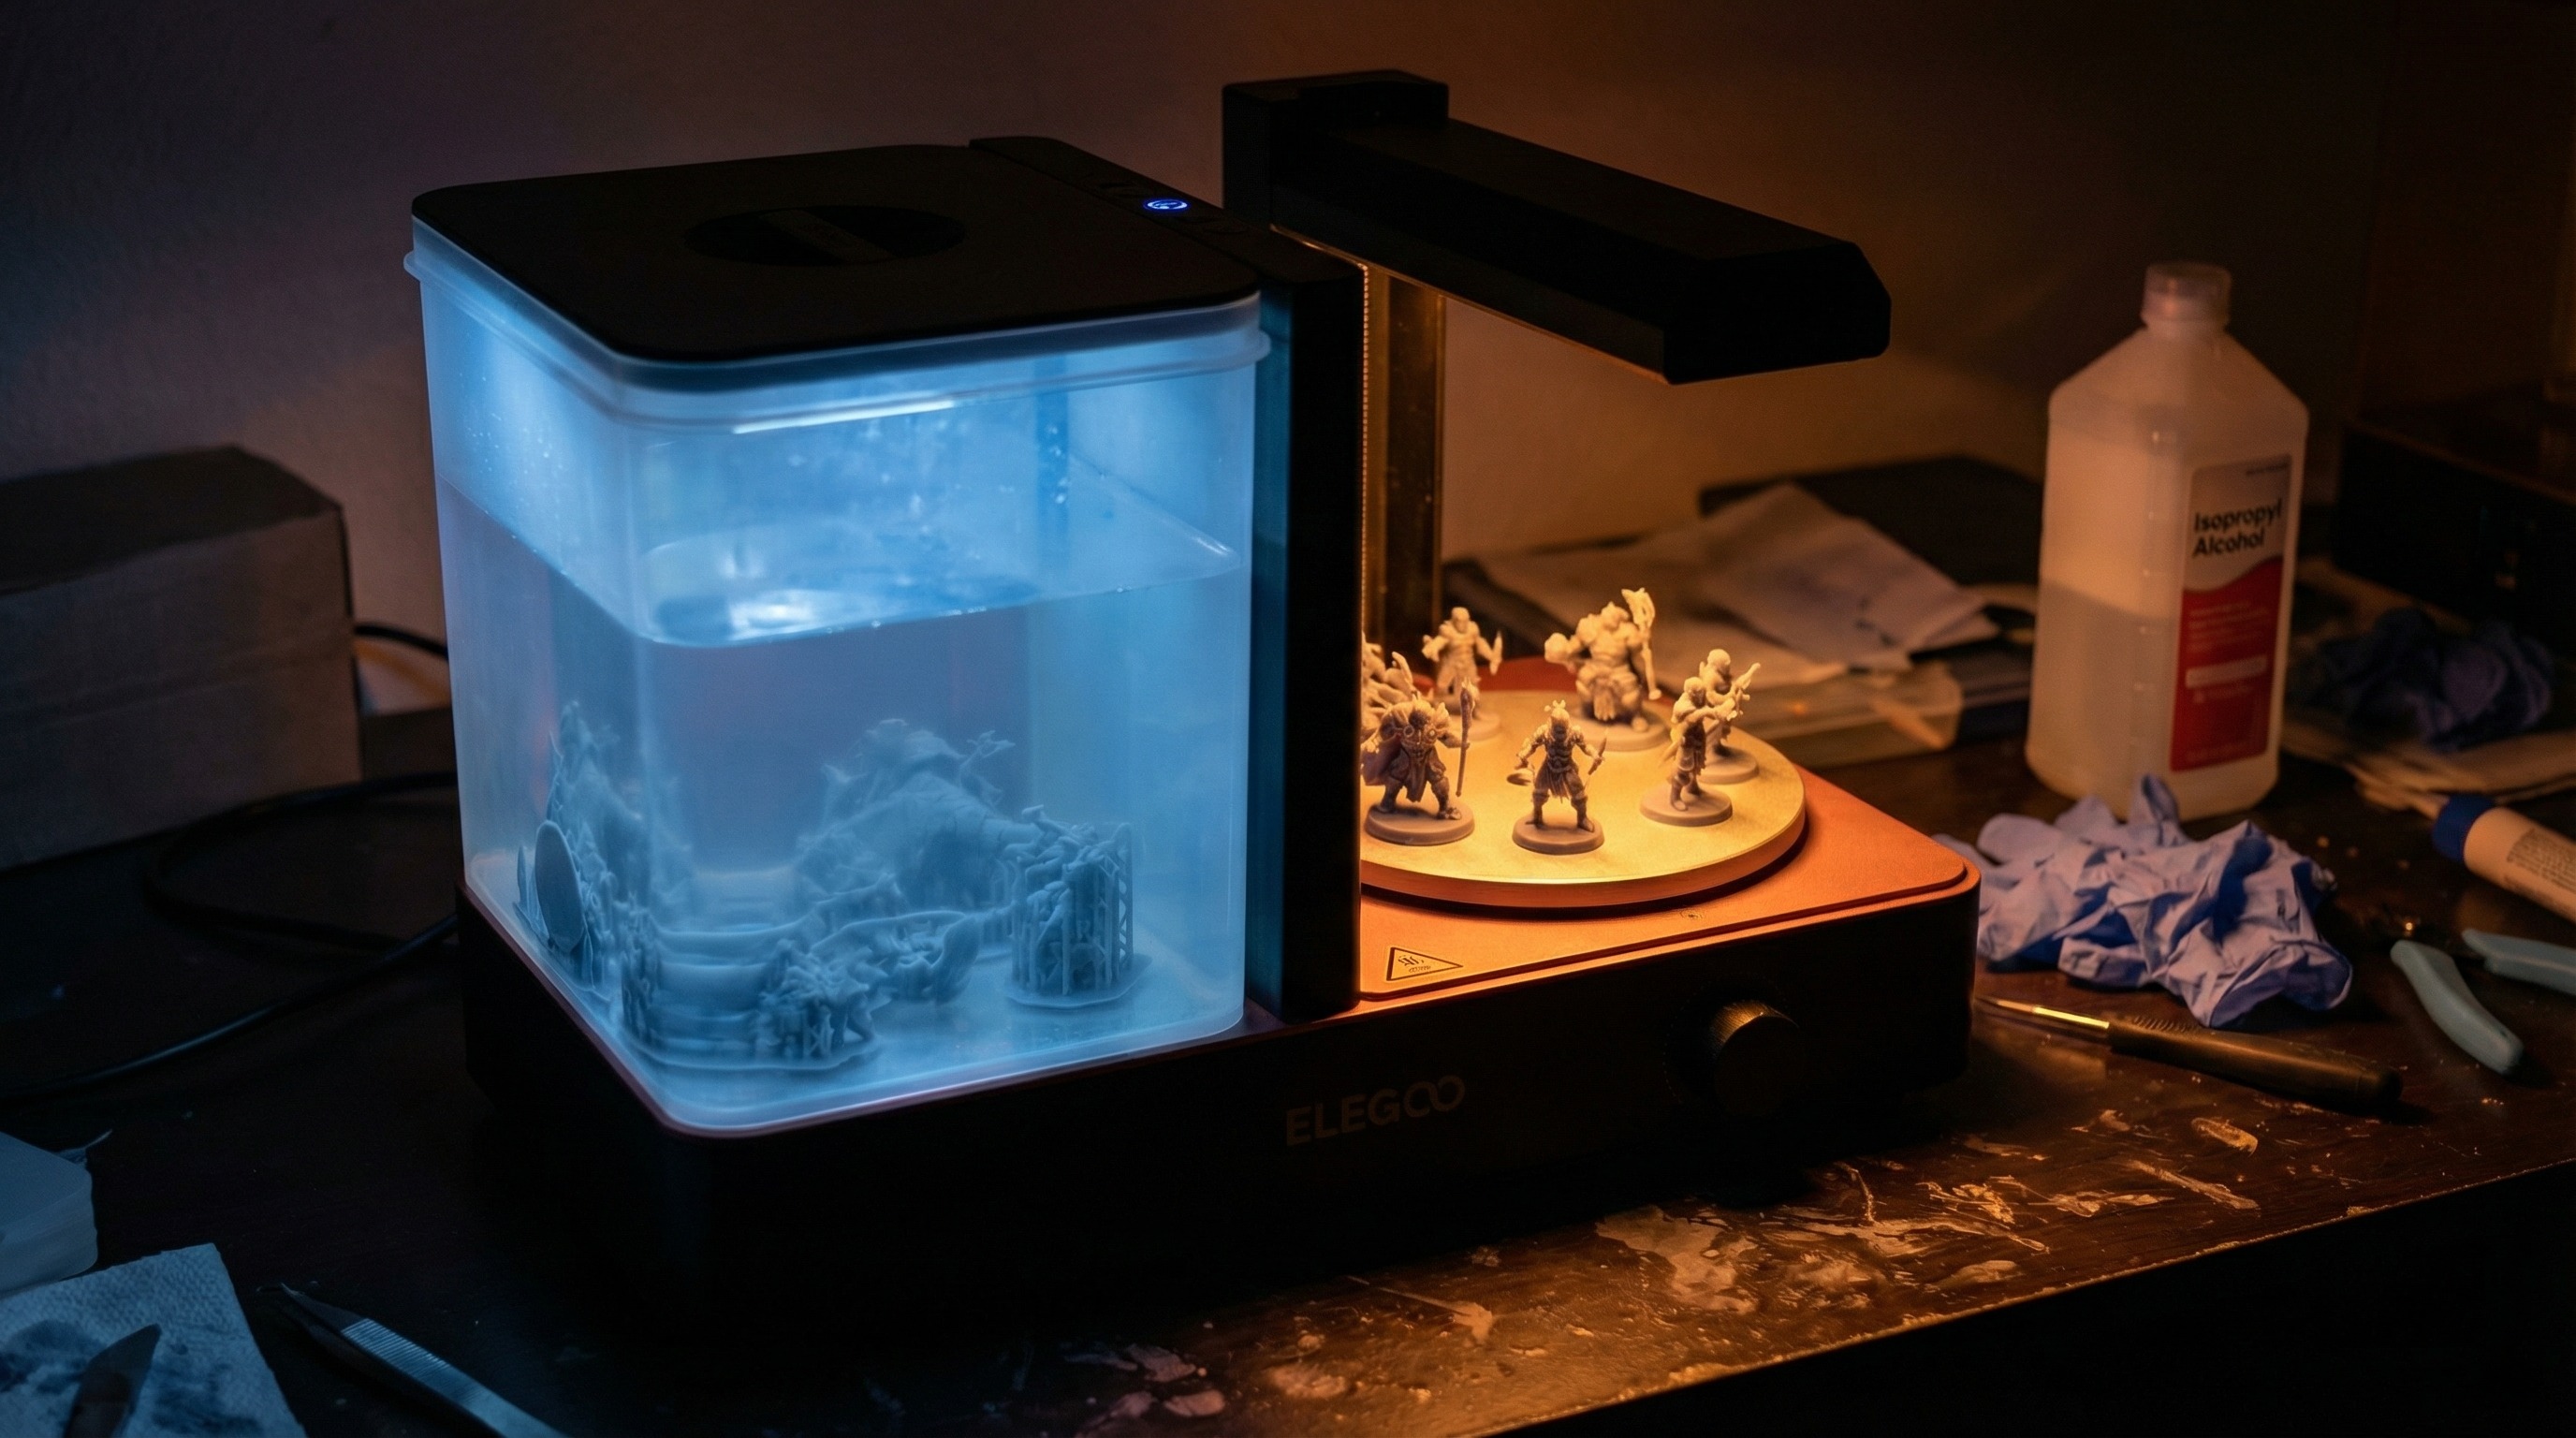
If you’re printing resin miniatures, a wash and cure station is not optional equipment. It’s the second half of the print. Every MSLA print comes off the build plate uncured — still soft, still chemically active, still covered in liquid resin that needs to be cleaned off before the UV cure locks the layers together. Trying to skip or shortcut this step gives you sticky surfaces, compromised detail, or brittle prints that fail under paint.
The question is which station to buy. The answer depends on how much you print, what size your printer is, and whether you’re running a one-at-a-time hobby workflow or batch printing several plates before washing.
This guide covers the options that are actually worth considering in 2026. If you’re still deciding whether you need a dedicated station or are new to the resin workflow entirely, the complete beginner’s guide to resin miniature printing has the full context.
What a Wash and Cure Station Actually Does
The wash step uses isopropyl alcohol (typically 95%+) or a purpose-built resin cleaner to remove uncured resin from the print surface. Most dedicated stations use a rotating basket and magnetic stirrer to circulate the IPA around the print — more effective than manual agitation and keeps your hands out of the chemistry.
The cure step uses UV light (usually 405nm, matching your printer’s wavelength) to post-cure the print after washing and drying. Post-cure hardens the resin fully, improves impact resistance, and locks in surface detail. How long you cure depends on the resin — ABS-like resins typically need 1–3 minutes, standard resins can be slightly less. Most stations have a turntable to expose all sides evenly.
The key spec to care about for miniature printing is chamber volume — whether the wash basket is large enough to fit your build plate prints in a single batch. A printer with a 130x80mm build plate that you can’t fit in the wash station is a real workflow problem when you’re running multiple prints.
The Recommendations
Best Overall: Elegoo Mercury Plus 2.0
The Mercury Plus 2.0 is the default recommendation and has been for a while. Elegoo has refined this product through enough iterations that the current version gets the workflow right: good chamber size, reliable magnetic stirrer, and UV curing that works without fussing over placement.
The wash chamber fits prints from most 6-inch class printers (Elegoo Saturn, Anycubic Photon Mono 4K, Phrozen Sonic Mini) without issue. It won’t accommodate larger 8–12 inch format builds, but for miniature printing — where the Saturn is the ceiling for most people — it’s the right size.
What’s good:
- Magnetic stirrer is genuinely effective — IPA circulation is consistent without manually moving the print
- Wash and cure functions are in a single unit with a lid that converts between modes
- Turntable keeps cure exposure even without babysitting
- LCD display and timer on the cure cycle — you set it and move on
- Quiet operation compared to older Mercury versions
What’s not ideal:
- IPA fill line for the wash function is on the lower side — you need enough fluid volume to fully submerge prints, which can mean topping up more often than expected
- The wash basket has small openings at the bottom. Fine details (thin banners, small basing materials) occasionally fall through. Not a dealbreaker but worth knowing.
Approximate cost: $45–$65 depending on sales (Elegoo direct and Amazon).
Best for: Anyone printing on an Elegoo Mars, Saturn, or equivalent 4K–8K 6-inch class printer. The standard starting point for a reason.
Runner-Up: Anycubic Wash & Cure Plus
The Anycubic Wash & Cure Plus is the direct competitor to the Mercury Plus 2.0 and has one meaningful advantage: a larger wash chamber. If you’re running an Anycubic Photon Mono X or any of the larger mono 4K printers, the Plus gives you the extra capacity to fit full build plates without trimming the batch.
The magnetic stirrer performs comparably to the Elegoo version. The cure cycle is slightly longer at equivalent settings, which some users adjust by reducing cure time manually — this is normal, not a defect.
What’s good:
- Larger capacity than most competitors at this price point — fits more prints per wash cycle
- Anycubic’s design keeps the wash and cure functions cleanly separated visually, which makes the dual-mode operation intuitive
- Solid build quality — the unit feels stable, doesn’t vibrate off the workspace
What’s not ideal:
- Slightly bulkier footprint than the Mercury Plus 2.0 — if workspace is tight, this matters
- The default timer increments on cure are coarser than Elegoo’s, which makes fine-tuning slightly less precise for resins that need shorter cure windows
Approximate cost: $55–$75 (Amazon, Anycubic direct).
Best for: Anycubic printer owners, especially anyone on the Photon Mono X or larger format where the extra capacity matters.
Budget Pick: Elegoo Mercury (Standard)
The original Mercury — not the Plus, not the 2.0 — is still sold and still works. It lacks the magnetic stirrer of the updated version, meaning wash agitation is handled by manually rocking the basket or running a wash cycle that just sloshes the IPA. It’s less effective than mechanical stirring, especially for prints with complex geometry.
For someone printing occasionally on a small format printer (Elegoo Mars 3 or equivalent, with a modest build plate), the standard Mercury is functional. For anyone running a regular printing schedule or using a printer with a build plate larger than 130mm, skip it and get the Mercury Plus 2.0 — the price difference doesn’t justify the workflow downgrade.
Approximate cost: $30–$45 (Amazon).
Best for: Very light printing, small format only, when budget is the hard constraint.
For Large Format Printing: Phrozen Mega Wash & Cure
If you’ve moved up to an 8K or 12K large format printer — the Phrozen Sonic Mega 8K, Elegoo Saturn Ultra, or similar — the standard wash and cure stations are undersized. The Phrozen Mega Wash & Cure is the purpose-built answer for large build plates.
The chamber is substantially larger, the UV cure array has wider coverage, and the magnetic stirrer is scaled to move fluid volume across a larger basin. This is not a station for someone printing 28mm minis on a compact printer — it’s overkill. But if you’re printing terrain at scale, large monsters, or full vehicle models, this is the station that fits the workflow.
Approximate cost: $90–$130 (Amazon, Phrozen direct).
Best for: Large format printers only. Not relevant if you’re printing standard 6-inch class minis.
Comparison Table
| Station | Wash Capacity | Stirrer | Approx. Cost | Best For |
|---|---|---|---|---|
| Elegoo Mercury Plus 2.0 | Medium (6” class) | Magnetic | $45–$65 | Default pick for most hobbyists |
| Anycubic Wash & Cure Plus | Medium-Large | Magnetic | $55–$75 | Anycubic printers, slightly more capacity |
| Elegoo Mercury (standard) | Small-Medium | None | $30–$45 | Budget, light use only |
| Phrozen Mega Wash & Cure | Large | Magnetic | $90–$130 | 8K/12K large format builds |
What to Think About When Choosing
Match the station to your printer, not your aspirations. The Mercury Plus 2.0 is right for most people because most people are printing on a 6-inch class mono printer. If you have a smaller printer or a larger one, size accordingly.
Magnetic stirrer is worth paying for. The difference between manual agitation and mechanical stirring is real. If you print regularly, you’ll notice it — particularly with complex prints where IPA needs to reach all surfaces. The budget Mercury skips this. The Plus 2.0 and everything above it includes it.
Chamber volume vs. build plate volume. Check the wash chamber dimensions against your printer’s build plate. A common mistake is assuming compatibility when the wash basket is technically large enough in X/Y but doesn’t give enough depth for tall prints or support structures. Most stations list internal dimensions in their specs.
IPA consumption. Dedicated wash stations use more IPA than jar washing because the chamber requires a fill level to submerge prints properly. Budget for IPA as a recurring supply, and consider a dedicated IPA reclaim setup if you’re printing frequently. Cleaning contaminated IPA by leaving it in sunlight to cure the resin particles — then filtering and disposing of the solids — extends the life of your IPA significantly.
The Workflow These Stations Support
For context on how wash and cure fits into the full resin printing process — including timing between print and wash, how long to cure different resins, and what to do with contaminated IPA — the resin miniature printing beginner’s guide covers this end-to-end.
For resin selection — which directly affects how long you’ll cure — see best resin for 3D printing miniatures.
For PPE and IPA disposal — relevant every time you run the wash station — see the resin printing safety guide.
Frequently Asked Questions
Do I need a dedicated wash and cure station, or can I use a jar and a UV nail lamp? You can, especially when starting out. A mason jar of IPA and an inexpensive UV nail lamp will complete the workflow. The dedicated station is a quality-of-life upgrade: cleaner hands-off process, better agitation, more consistent cure coverage. If you’re printing once a month, the jar method is fine. If you’re printing weekly or more, the station pays for itself in time and frustration.
Can I use the same station for all resin brands? Yes. Wash and cure stations are not brand-specific. The wash function works with any IPA or resin-compatible cleaning fluid, and the UV cure (405nm) works with any standard MSLA resin. You don’t need to match the station brand to your printer or resin brand.
How often do I need to replace the IPA in the wash station? It depends on print volume and how contaminated the IPA gets. A practical indicator: when the IPA has become so loaded with resin particles that it looks murky and brown rather than clear or light yellow, it’s time to reclaim or replace. For occasional printing, a 500ml fill can last months. For weekly printing, expect to refresh more often.
What concentration of IPA should I use? 95% or higher. Lower concentrations (70%, the common drugstore version) contain water, which reduces cleaning effectiveness and can cause print surface issues. Industrial-grade 99% IPA is ideal and available from janitorial supply sources in larger volumes at lower cost per liter than pharmacy-grade.
Can I cure without washing first? No. Curing before washing traps uncured resin inside the print and locks surface contamination in place. Always wash first, let the print dry (5–10 minutes is enough), then cure. Curing wet prints can also cause cloudiness on the surface.
Is post-curing required, or does the printer’s UV exposure handle it? The printer’s UV exposure cures layers to a “green state” — structurally formed but not at full mechanical strength. Post-curing with a dedicated station brings the print to full hardness and improves impact resistance. For miniatures that will be handled and painted, post-curing is worth doing. For display pieces that won’t be touched, it’s less critical but still recommended.